Picture this: you glance at your electric bill, sigh, and wonder if there’s a better way.
We’ve all been there—watching numbers climb while the sun does its thing outside, completely free.
What if I told you that harnessing that sunlight could actually shrink those monthly charges and even put a little extra cash back in your pocket?
That’s the promise behind solar energy savings, and it’s not some far‑off sci‑fi fantasy.
Think about the last time you felt the sting of a high‑usage weekend, air‑conditioning humming, thermostat set to “cool” and the meter spinning faster than a race car.
Now imagine swapping that spike for a steady, predictable bill that feels more like a gentle breeze than a storm.
Sounds nice, right? But how does it actually happen?
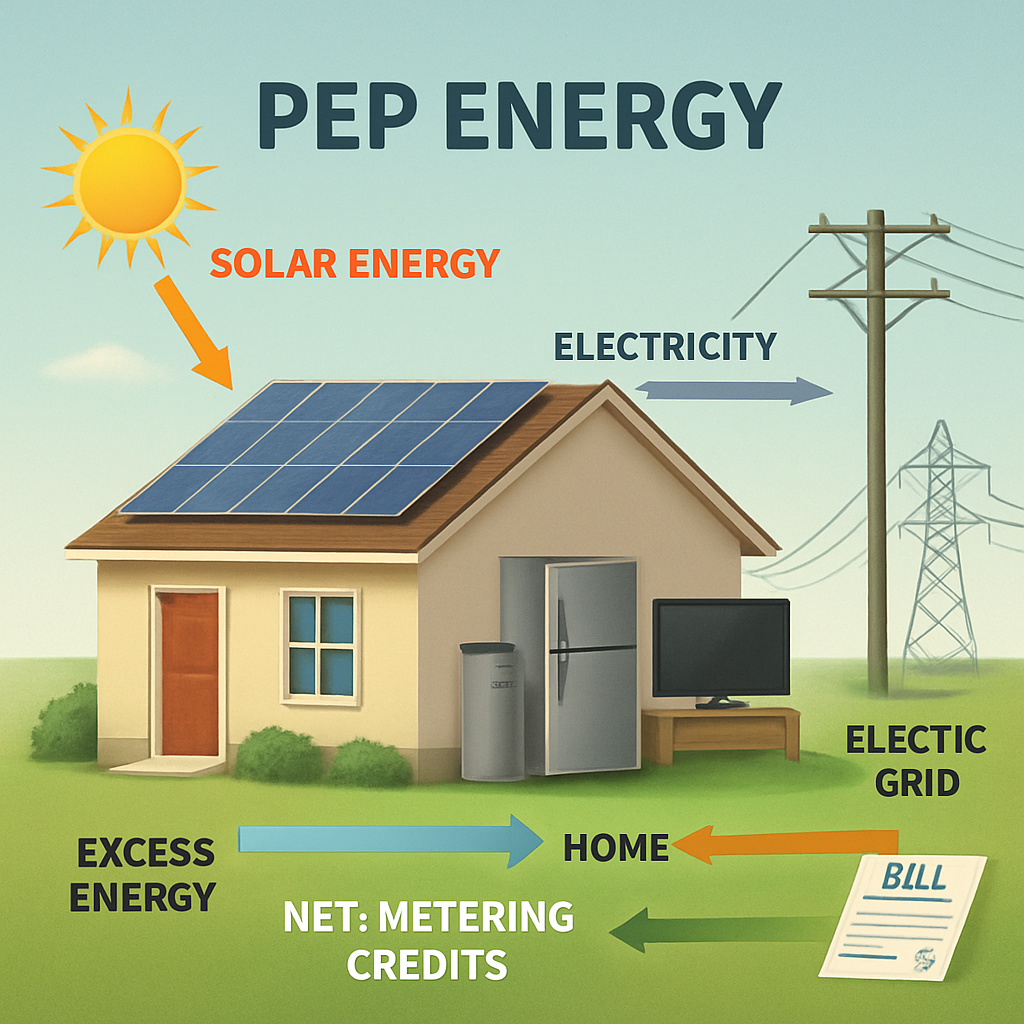
First, solar panels turn sunlight into electricity right on your roof, feeding your home or business directly and sending any surplus back to the grid.
Every kilowatt‑hour you generate yourself is a kilowatt‑hour you don’t have to buy, which is the core of solar energy savings.
And it gets better: many utilities offer net‑metering credits, so the extra power you produce can offset future usage, effectively turning your roof into a tiny bank.
Even if you’re not ready to buy panels outright, options like solar leasing or financing let you start saving now while paying over time.
That flexibility means more homeowners and business owners can tap into those savings without a massive upfront hit.
So, you might be asking, “Will I really see a difference?”
Most folks notice a drop in their bills within the first few months, and over the life of a system—often 20‑25 years—the cumulative savings can reach thousands of dollars.
It’s not magic; it’s physics and smart financial planning working together.
Ready to explore how much you could save and what steps to take next?
Let’s dive in and uncover the practical ways solar energy savings can transform your electricity costs.
TL;DR
Solar energy savings let you slash monthly electricity bills, turn your roof into a small power plant, and even earn credits when excess energy feeds the grid.
Whether you buy, lease, or finance panels, you’ll see noticeable cuts within months and thousands of dollars saved over the system’s 20‑plus year life.
Understanding Solar Energy Savings Basics
Okay, let’s get into the nuts and bolts of what actually makes solar energy savings happen. Imagine your roof is a little money‑making factory. Every ray of sunshine that hits your panels turns into kilowatt‑hours (kWh) you didn’t have to buy from the utility. That’s the core idea – you generate, you use, you save.
But it’s not just about the panels themselves. The real savings start when you figure out how much of your own electricity you can offset and how the utility treats the excess. That’s where net‑metering comes into play.
Net‑metering: Turning Surplus into Credit
When your system produces more power than you need, the extra flows back into the grid. Most utilities will credit you for that energy, usually at the same rate you’d pay for electricity. Think of it as a two‑way street – you draw from the grid at night, and you give back during the day. Those credits can shave off future bills, sometimes even covering an entire month’s charge.
So, does it work everywhere? In Arizona, for example, the state’s net‑metering policies are pretty generous, which is why many homeowners see a noticeable dip in their bills within just a few months. Is Solar Worth it in Arizona? (2025 Homeowner’s Guide) dives deeper into those local nuances.
How Much Can You Really Save?
First, look at your historical electricity usage – the kilowatt‑hours you’ve been paying for each month. Then, estimate how many kWh your system will produce based on roof orientation, shading, and local sun hours. A rough rule of thumb: a 5‑kW residential system in a sunny climate can generate around 7,500 kWh per year.
If you typically use 1,200 kWh a month, that’s about 14,400 kWh a year. The solar system could cover roughly half of that, slashing your bill by 40‑50 % after the first year. Over a 25‑year lifespan, you’re looking at thousands of dollars saved – not to mention the added property value.
Key Factors That Influence Savings
- System Size: Bigger isn’t always better. Size it to match your average consumption.
- Orientation & Tilt: Panels that face true south (in the Northern Hemisphere) and are angled correctly capture the most sun.
- Electricity Rates: The higher your utility’s rates, the more each kWh you generate is worth.
- Incentives & Tax Credits: Federal ITC, state rebates, and local utility programs can cut upfront costs dramatically.
Speaking of incentives, many solar owners are also adding battery storage to keep excess energy for nighttime use. That can boost savings even further, especially if you’re on a time‑of‑use rate plan.
Now, let’s talk about the practical side of making those numbers a reality.
Financing Options and Their Impact on Savings
If you’re not ready to pay cash up front, you have a few routes: loans, leases, or power purchase agreements (PPAs). Each affects your cash flow differently. Loans let you own the system and claim the tax credit, but you’ll have monthly loan payments. Leases and PPAs often have little to no upfront cost, but the savings show up as a reduced electricity bill rather than a direct cash‑in.
For businesses looking to streamline quoting and installation, AI‑driven automation can make a huge difference. Platforms like Assistaix help solar companies automate proposals, schedule crews, and manage customer follow‑ups, ultimately lowering costs and passing more savings to you.
And if you’re already dreaming about pairing solar with an electric vehicle, you’ll want to make sure your charging schedule aligns with peak solar production. That’s where tools like Selene, the AI‑powered EV assistant come in handy – it helps you plan charging times to maximize the use of solar‑generated electricity.
Below is a quick visual that sums up the flow of energy and money in a typical residential solar setup.

Want a deeper dive? Check out the video that walks through a real‑world example of monthly savings calculations.
In practice, you’ll start seeing the bill reduction within the first billing cycle after the system is energized. Keep an eye on the utility’s monthly statement – the credit line will appear as a separate “Solar Production” entry. If you notice any discrepancies, a quick call to your utility’s net‑metering department usually clears things up.
Bottom line: Solar energy savings aren’t a vague promise; they’re a measurable reduction in the amount you pay for electricity, amplified by incentives and smart financing. By understanding the basics – generation, net‑metering, system sizing, and financing – you can confidently estimate how much you’ll save and take the next step toward a sunnier, cheaper energy future.
How to Calculate Your Home’s Solar Savings
Ever stared at your electric bill and thought, “There’s got to be a better way?” You’re not alone. The math can feel a bit like trying to read a foreign language, but once you break it down, the picture gets crystal clear.
Step 1: Pull Your Utility Data
First, grab the last 12 months of bills. Add up the kilowatt‑hours (kWh) you used each month, then divide by 12. That gives you an average monthly usage – the baseline you’ll be trying to replace with sunshine.
Tip: If your bills are paper‑less, most utilities let you download a CSV file. A quick spreadsheet can turn those numbers into a neat chart you can actually read.
Step 2: Size the System to Your Roof
Next, look at your roof. South‑facing roofs (or anywhere between southeast and southwest) with a tilt of 15‑40 degrees tend to perform best, but east‑west roofs aren’t out of the game either.
Take a phone and snap a few photos from ground level – you’ll want to note any trees, chimneys, or vents that could cast shadows. Those shadows can shave off anywhere from 5% to 30% of output, so the more detail you capture, the better your estimate.
Once you have the orientation and shade map, plug the data into a solar calculator. Most online tools will spit out an expected annual production in kWh based on your zip code’s solar irradiance.
Step 3: Add Up Costs and Incentives
Now it’s time to talk money. Start with the total installed price your installer quotes. Then subtract any upfront incentives – think federal tax credit, state rebates, or local utility rebates.
According to the U.S. Department of Energy, you can calculate your payback period by dividing the net cost (after incentives) by the annual financial benefit – basically, the amount you save on electricity each year plus any annual incentives you still receive (DOE explains the payback formula). The result, expressed in years, tells you how long it will take for the system to pay for itself.
Step 4: Crunch the Numbers with a Simple Spreadsheet
Open a new sheet and create three rows: “Net Cost,” “Annual Savings,” and “Payback Years.” For annual savings, multiply your average monthly bill by 12, then adjust for the percentage of that bill you expect the system to offset (most homeowners see 70‑90% offset after accounting for shading and system size).
Example: Say your average monthly bill is $150, so $1,800 a year. If your projected system covers 80% of usage, that’s $1,440 saved annually. If the net cost after incentives is $9,000, the payback comes out to about 6.25 years. After that, the electricity is essentially free, and every kilowatt‑hour you generate is pure profit.
Want to see the math in action? Check out the quick video below – it walks you through the calculator step by step.
After you watch, take a moment to compare the payback years to other low‑risk investments you might consider, like a high‑yield savings account or a diversified index fund. If the solar payback is under 10 years, most financial advisors agree it’s a smarter bet than many traditional options.
Quick Checklist
- Gather 12 months of utility bills.
- Measure roof orientation, tilt, and shade.
- Run a solar production estimate for your zip code.
- Subtract all upfront incentives from total system cost.
- Calculate annual savings and divide to find payback years.
- Compare the payback period to other investment returns you could earn.
If the numbers look good – and they usually do in sunny states like Arizona – you’re ready to move forward with confidence. The next step is to get a detailed proposal from a local installer who can fine‑tune the shading analysis and lock in any remaining rebates.
Remember, solar energy savings aren’t just about the dollars on your bill today; they’re about turning your roof into a long‑term asset that keeps on giving.
Financing Solar: Incentives and Tax Credits
When you start thinking about solar, the first thing most homeowners ask is, “How much of this money can I actually keep?” The answer lives in a mix of federal tax credits, state rebates, and the financing route you pick.
The federal Residential Clean Energy Credit
The biggest boost right now is the 30% credit for qualified solar equipment installed between 2022 and 2032. That means if your system costs $15,000 before any rebates, you could shave $4,500 off your tax bill.
The credit doesn’t expire until 2032, then it steps down to 26% for 2033 and 22% for 2034. It’s non‑refundable, so you can only use it up to the amount of tax you owe, but any leftover can be carried forward to future years. The IRS spells out exactly what counts as “qualified expenses” – the hardware itself, plus labor for installation, wiring, and even the permitting fees, minus any rebates you already received.IRS Residential Clean Energy Credit
State, utility and local incentives
Every state has its own flavor of cash‑back programs, from upfront rebates to performance‑based incentives that pay you for the kilowatt‑hours you generate. In Arizona, for example, the state rebate can be a few hundred dollars per kilowatt, and some utilities still offer net‑metering credits that roll over month to month.
Because these programs change yearly, it helps to check the DSIRE database or your local utility’s website before you sign a contract. Remember, any rebate you receive reduces the base cost you use to calculate the federal credit – the IRS treats those rebates as a purchase‑price adjustment.
Financing options: cash, loan, or lease?
If you have the cash sitting in a savings account, buying outright still gives you the highest long‑term savings. No interest, you own the system from day one, and you claim the full federal credit yourself.
Most homeowners, however, opt for a solar loan. A $0‑down loan lets you start saving on your electric bill immediately while you make fixed monthly payments. Fixed‑rate loans protect you from utility rate hikes and let you still claim the credit because you own the panels.EnergySage financing guide
Leases and power‑purchase agreements (PPAs) are the “no‑money‑down” route. The solar company keeps ownership, handles maintenance, and passes the tax credit on to you through a lower monthly rate. The trade‑off is you won’t see the same boost in your home’s resale value, and you may face escalation clauses after a few years.
Quick decision checklist
- Do you have enough cash to cover the net cost after rebates? If yes, buying maximizes savings.
- Would you prefer lower upfront cost and still own the system? Look at 0‑down solar loans.
- Need immediate savings with zero out‑of‑pocket? A lease or PPA might fit, just verify the provider passes the tax credit through lower rates.
- Check your state’s rebate calendar and net‑metering rules before you lock in any price.
One thing to remember: the financing choice you make also determines which incentives you can actually claim. Ownership = you claim the federal credit; third‑party ownership = the provider claims it, but reputable installers will reflect that saving in your monthly payment.
So, where do you stand? If you’re comfortable with a modest loan and want the biggest possible Solar energy savings over 25 years, go for ownership and claim the credit yourself. If you’d rather keep your cash free for another project—maybe an electric‑vehicle charger or a home battery—consider a lease that still gives you a lower rate thanks to the passed‑through credit.
Bottom line: map out the total out‑of‑pocket cost after all rebates, apply the 30% federal credit, and then compare the net cost of each financing path. That’s the math that turns “solar sounds nice” into a concrete, money‑saving plan.
Optimizing Maintenance for Maximum Savings
When you finally see those lower electric bills, you’ll wonder why you ever worried about a dirty panel. The truth is, most of the time nature does the heavy lifting – rain, wind, and the sun keep panels pretty clean on their own.
But there are a few sneaky scenarios where neglect can shave a few percent off your solar energy savings, and over 20 years that adds up. Let’s walk through the low‑effort habits that keep your system humming and your wallet happy.
Know when cleaning actually matters
Solar Analytics dug into years of performance data and found that ordinary dust, leaves, or bird droppings rarely dip output more than 5 % – and that number often disappears after the next rain (Solar Analytics research shows). So if you live in a rainy climate with a well‑pitched roof, you can probably skip the monthly hose‑down.
Flat panels or installations under a favorite bird perch are the exception. When panels sit almost level, water can pool and dust lingers longer. In those cases a gentle rinse every six months can reclaim that missing 1‑2 % of production, which translates to a modest boost in savings.
Use a monitoring app to spot the dip before it becomes a habit
Most homeowners only glance at their utility bill once a year. A modern monitoring platform watches real‑time output, compares it to weather data, and sends you a heads‑up if production falls outside the expected range. Catching a sudden 10 % dip could mean a loose connection, a shading change, or a buildup that really does need attention.
When the alert pops up, check for obvious culprits: a new tree branch, recent construction dust, or a layer of bird droppings on a low‑angle panel. A quick hose from ground level often fixes it, and you’ll see the numbers bounce back within days.
Schedule professional inspections wisely
Climbing onto the roof with a power washer is a bad idea – you’re mixing water, electricity, and height, which is a recipe for disaster. Instead, arrange for a licensed solar installer to do a yearly visual check. They can spot cracked glass, loose mounts, or corrosion that a DIY cleaning crew might miss.
Most warranties don’t require regular cleaning, but they do expect you to keep the system in “good working order.” A professional inspection keeps the warranty intact and prevents costly downtime that would erode your savings.
Maintain the surrounding environment
Trim tree branches that cast moving shadows across the array, especially in the summer months when the sun’s angle is high. Even a small shade can knock out 10‑15 % of production on a sunny day. If you have an adjacent roof with a vent or antenna, consider relocating it or adding a small baffle.
Quick checklist for maximum solar energy savings
- Inspect panels after major storms – look for dislodged tiles or debris.
- Use a monitoring app; act on alerts within 48 hours.
- Rinse flat or low‑angle panels twice a year with a garden hose.
- Schedule a licensed inspection once per year.
- Trim any new shade‑casting foliage each season.
Follow those steps and you’ll squeeze every last watt out of your system without turning maintenance into a full‑time job.

Remember, the biggest lever for solar energy savings isn’t a fancy gadget – it’s consistency. A few minutes of seasonal care, a quick glance at your performance dashboard, and the occasional professional check keep your system performing at its peak for decades.
Comparing Solar System Options for Savings
When it comes to solar energy savings, the hardware you pick and the way you pay for it can change the math by thousands of dollars.
So, which combo gives you the biggest bite out of your electric bill? Let’s walk through the most common choices, sprinkle in a couple of real‑world stories, and finish with a quick decision checklist you can use right now.
Panel chemistry: monocrystalline vs polycrystalline
Monocrystalline panels are the sleek, black cells you see on many new roofs. Because each cell is cut from a single silicon crystal, electrons have more room to move, pushing efficiency past 23 % in top models. That means you need fewer panels to hit the same kilowatt‑hour target, which can be a lifesaver if roof space is tight.
Polycrystalline panels, by contrast, are built from melted‑together silicon fragments. They sport a blue hue and usually hover a few points lower on the efficiency scale—most hover under 20 %. The upside? A lower price tag per watt.
Both types qualify for the federal solar tax credit, so the decision often boils down to space versus upfront cost. The choice often hinges on how much roof area you have versus how much you want to spend up front. EnergySage explains the efficiency trade‑off and shows how a higher‑efficiency panel can shave years off your payback when you’re cramped for roof real estate.
Real‑world example: the Miller family in Tucson
The Millers had a modest 1,200 sq ft roof with a few palm trees casting seasonal shade. They chose a 6 kW monocrystalline system because every square foot counted. In year 1 they offset 90 % of their usage, slashing a $210 monthly bill down to $22. Had they gone polycrystalline, they’d have needed about 8 kW to hit the same production, bumping the upfront cost by roughly $3,500 and extending the payback by 1.5 years.
Mounting style: roof‑mounted vs ground‑mounted
Roof‑mounted arrays are the default for most homeowners. They keep wiring short and avoid extra land‑use fees, but they inherit every roof quirk—shingles, vents, and that occasional squirrel‑theft.
Ground‑mounts shine when you have abundant land and want to angle panels for optimal sun exposure. The extra cost of a racking system and site prep can be offset by higher production, especially in hotter climates where a cooler panel temperature improves efficiency.
Think about the Johnsons, a small‑town bakery that installed a ground‑mount in 2023. Their 10 kW ground system produces 15 % more energy than a comparable roof array would have, translating into an extra $1,200 of savings each year (GreenLancer’s cost‑benefit analysis guide).
Financing choices: buy, loan, or lease
If you have cash on hand, buying outright gives you the biggest long‑term solar energy savings because you own every kilowatt‑hour and claim the full tax credit.
A zero‑down loan lets you start saving immediately while spreading payments over 10‑15 years. Fixed‑rate loans protect you from utility hikes and still let you own the system, so the credit stays with you.
Leases and power‑purchase agreements (PPAs) require no upfront money, but the installer retains ownership and passes the tax credit through a lower rate. You’ll still see lower bills, just not the same upside in resale value or total ROI.
Actionable comparison table
| Option | Typical Efficiency / Output | Impact on Savings |
|---|---|---|
| Monocrystalline panels | 22‑23 % (high) | Fewer panels → lower installation labor; faster payback when roof space limited. |
| Polycrystalline panels | 15‑19 % (moderate) | Lower upfront cost; may need larger array, extending payback. |
| Ground‑mount vs Roof‑mount | Ground: optimal tilt, cooler temps; Roof: standard tilt | Ground can boost annual production 10‑15 % → higher savings, but adds site‑prep expense. |
| Buy vs Loan vs Lease | Buy: full ownership; Loan: ownership + financing; Lease/PPA: no ownership | Buy = highest lifetime savings; Loan = strong savings with cash flow; Lease = modest savings, lowest upfront. |
Quick decision checklist
- Measure your roof area and note any shading. If you’re under 500 sq ft, lean toward monocrystalline.
- Ask yourself whether you have land available for a ground‑mount. A 10 % production boost can offset the extra $2‑3 k racking cost.
- Calculate your cash‑flow comfort: cash purchase → max savings; loan → strong; lease → modest savings, lowest upfront.
- Run a cost‑benefit model (many installers offer a free spreadsheet) and plug in the efficiency numbers above.
- Check local incentives before finalizing—every dollar you shave off the net cost shortens the payback period.
Bottom line? The right combination of panel type, mounting style, and financing can push your solar energy savings from “nice” to “game‑changing.” Take a few minutes to map your roof, run the numbers, and you’ll know exactly which option will put the biggest chunk of your electricity bill back in your pocket.
Real-Life Case Studies of Solar Savings
When the numbers start looking real, that’s when the excitement kicks in. Let’s walk through a handful of stories that show exactly how solar energy savings can turn a monthly bill into a pleasant surprise.
1. The Martinez family – suburban Arizona
The Martinezes live in a 1,800‑sq‑ft home in Mesa. They went with a 7 kW monocrystalline system because their roof was tight on space and they wanted the highest output per square foot. In the first 12 months the array produced about 10,500 kWh, covering roughly 85 % of their electricity use.
Before solar, their electric bill hovered around $260 each month. After the system was up and running, the bill dropped to just $45. That’s a $2,580 saving in year one and an estimated $60,000 in total savings over the system’s 25‑year life, even after accounting for a modest increase in utility rates.
2. Downtown Phoenix office – commercial, east‑west roof
ABC Consulting occupies a three‑story office with an east‑west roof that gets a lot of afternoon sun. They installed a 5 kW panel array paired with a 10 kWh battery to shave peak‑hour demand. The battery stores excess midday production and discharges it during the utility’s peak‑price window.
The result? Their electricity cost fell by 12 % in the first year and the battery added another 5 % reduction during summer months when rates spike. In dollar terms that’s about $4,200 saved annually, which more than pays for the battery’s $3,500 upfront cost within two years.
3. Rural Colorado farm – ground‑mount solution
Mike runs a small organic farm near Fort Collins. He had plenty of land but a modestly sized roof, so he opted for a ground‑mount system that could be tilted at the optimal 30° angle. The 12 kW array produces roughly 18,000 kWh per year – enough to run his irrigation pumps, greenhouse fans, and even a small processing line.
Because the panels stay cooler on the ground, the farm sees about a 14 % boost in production compared to a comparable roof‑mount. That extra output translates to roughly $3,000 in annual savings, and the farm qualifies for a state rebate that shaved $1,200 off the total cost.
4. The Liu household – solar lease in Texas
When the Lius moved into a newer home in Austin, they weren’t ready to buy a system outright. They signed a 20‑year lease for a 6 kW array. The lease includes maintenance, so the Lius never had to worry about cleaning or repairs.
Even with a lease, their monthly bill fell from $180 to $70. Over the first five years they’ve saved more than $6,500, and the lease’s escalation clause is capped at 2 % per year – still far lower than the historic utility rate hikes they were seeing before.
5. A multi‑family building in Nevada – mixed financing
Sunrise Apartments consists of three 2‑story buildings with flat roofs. The property manager chose a hybrid approach: a $20,000 cash down payment for a 15 kW system, then financed the balance with a zero‑down solar loan at 3.5 % interest. The loan’s monthly payment is $150, which is less than the $250 they were paying in electricity each month before solar.
Because the loan is structured so the owner retains the tax credit, the net cost after incentives dropped by another $5,000. The building now enjoys $1,100 in monthly savings, and the owner projects a payback period of just under six years.
What do these stories have in common? They all start with a clear picture of how much electricity they use, a realistic choice of system size, and a financing path that matches their cash flow. The result is a tangible reduction in the monthly bill and a long‑term boost to property value.
So, what should you take away?
- Map your roof or land, then pick the panel type that fits your space constraints.
- Consider whether a battery or ground‑mount can unlock extra production for your specific layout.
- Match financing to your comfort level – cash purchase for max ROI, loan for steady cash‑flow, or lease for zero upfront.
- Factor in local rebates and tax credits; they can shave thousands off the price tag.
If you run through these steps, you’ll be able to picture your own solar energy savings story before the first panel even arrives.
Conclusion
So, you’ve walked through shade, roof orientation, system sizing, financing, and maintenance – and you’ve seen how each piece nudges your solar energy savings higher.
If you’re still wondering whether it’s worth the jump, think about the Martinez family’s $2,500‑plus first‑year drop or the downtown office’s $4,200 annual cut – real dollars that stay in your pocket.
The good news? Most of that boost comes from choices you control: a tighter‑fit panel layout, a smart loan that matches cash flow, and a quick‑scan of local rebates before you sign.
Here’s a simple checklist to lock in those savings: map your roof, run a production estimate, compare cash vs loan vs lease, add the 30 % federal credit, and schedule a one‑time clean‑up after the first storm.
Take a moment now to pull your latest bill, jot down the kWh you use, and plug it into any solar calculator – you’ll see a clear picture of how many dollars you can shave off each month.
When the numbers line up, you’ll feel confident moving forward, whether you choose a cash purchase for max ROI or a loan that eases the upfront bite.
Ready to turn those savings from theory into reality? Give Sean Whitmer a call, get a free, no‑obligation proposal, and watch your roof start paying you back.
FAQ
What exactly are solar energy savings and how do they show up on my bill?
Solar energy savings are the dollars you keep because the sun powers part—or all—of your home or business instead of the grid. Once your system is online, the utility reads how many kilowatt‑hours you generate and offsets the amount you’d otherwise buy. The difference appears as a lower line‑item on your monthly statement, and if you produce more than you use, you may even earn a credit through net‑metering.
How can I estimate my solar energy savings before I sign a contract?
Start by pulling your last 12 months of electric bills and averaging the kilowatt‑hours you consume each month. Then use a reputable solar calculator: plug in your address, roof orientation, tilt, and any shading you’ve noted. The tool will estimate annual production and translate that into a dollar amount based on your utility’s rate schedule. Compare that figure to the system’s total cost after rebates to see a rough payback period.
Do financing options like loans or leases affect my solar energy savings?
Yes, they change the net cash flow. When you buy outright, every kilowatt‑hour saved is pure profit, and you claim the full federal tax credit, which boosts savings. A zero‑down loan still lets you own the panels, so you keep the credit and enjoy the same production, but you’ll pay interest on the loan, which slightly reduces net savings. Leases or PPAs give you a lower upfront bill, but the provider owns the system and takes the tax credit, so your monthly savings are lower than if you owned the array.
How much can routine maintenance impact my solar energy savings?
Cleaning a dusty, low‑angle array twice a year can reclaim 1‑2 % of lost production, which adds up over a decade. More importantly, catching a loose connection or shading change early—using a monitoring app that alerts you to drops—prevents larger losses. A yearly professional inspection keeps warranties intact and spots cracked glass or corrosion before they become costly repairs, preserving the full savings potential of your system.
Will adding a battery change my overall solar energy savings?
A battery doesn’t increase the total energy the panels make, but it lets you store excess production for later use—especially during peak‑rate hours when electricity is most expensive. If your utility charges higher rates in the late afternoon, a well‑sized battery can shift self‑consumption from cheap midday solar to costly peak periods, effectively raising the dollar value of each kilowatt‑hour you generate.
How do local rebates and the federal tax credit factor into my savings calculation?
Both act as upfront discounts that lower the amount you actually pay for the system. The federal Residential Clean Energy Credit lets you claim 30 % of the qualified installation cost on your tax return, which can shave thousands off the price. State or utility rebates are applied directly to the invoice, reducing the base cost you use to calculate the federal credit. Together they compress the payback window and boost lifetime savings.
What’s the best way to track whether my solar energy savings meet expectations?
Use the monitoring portal your installer sets up—it shows real‑time production, daily usage, and a savings estimate based on your utility’s rates. Compare the monthly savings figure to the projection you got from the calculator. If you notice a consistent shortfall of more than 10 %, investigate shading changes, panel soiling, or inverter warnings. Regularly updating your consumption baseline (especially after adding an EV or new appliance) keeps the comparison fair.


