Picture this: you’re sitting on your porch in the middle of July, the sun beating down like a furnace.
We’ve all felt that sting, especially when the heat seems to make every appliance work harder. That’s why finding the best solar panels for hot climates isn’t just a nice‑to‑have—it’s practically a survival skill for your wallet.
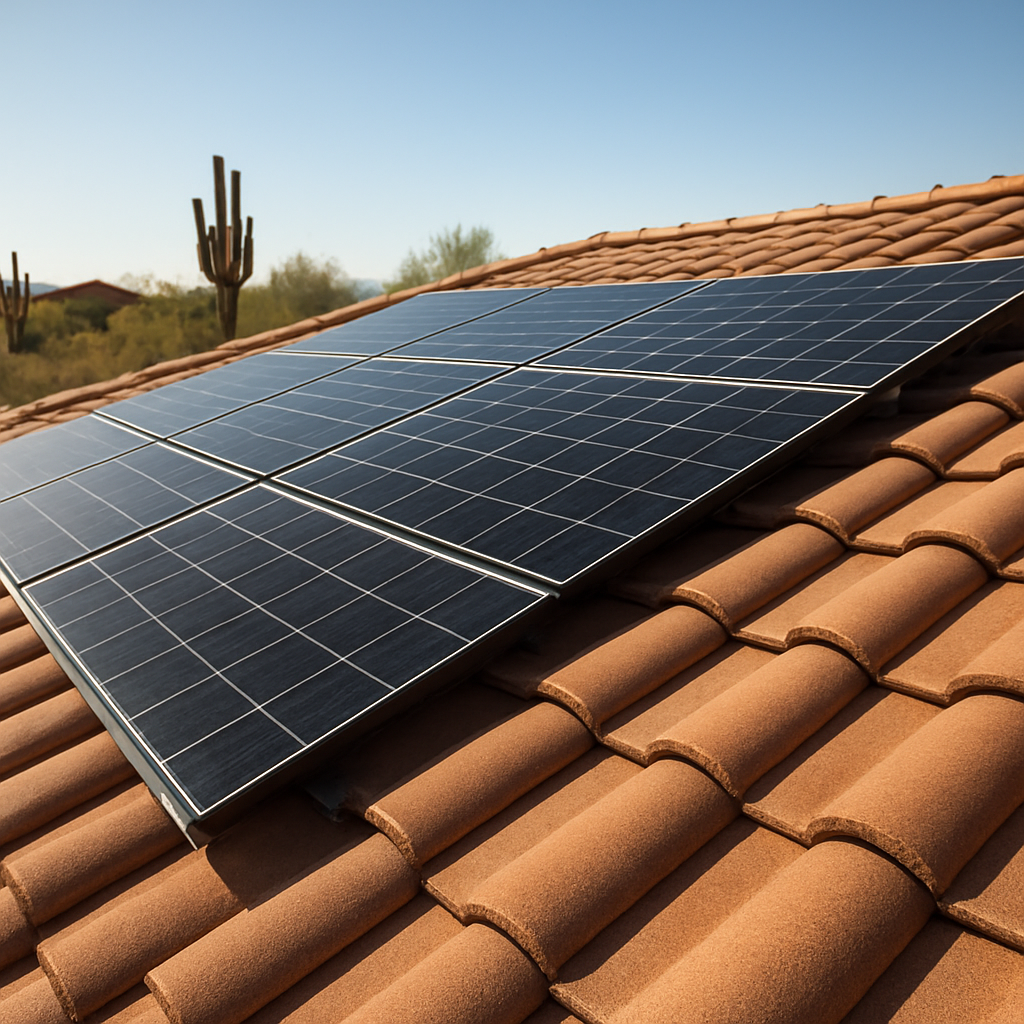
In our experience at Pep Energy, the panels that actually thrive under scorching temps are the ones built with high‑temperature‑rated glass and robust frame designs. They keep their efficiency up even when the mercury spikes above 100°F.
But here’s a quick reality check: not every “high‑efficiency” panel stays efficient when it’s baking. Some lose up to 20% of their output after just a few weeks of relentless sun.
So, what should you look for? First, check the temperature coefficient – a lower number means the panel loses less power as it heats up. Second, favor cells made from mono‑crystalline silicon; they tend to handle heat better than poly‑crystalline counterparts. Third, consider panels with built‑in cooling features, like a back‑sheet that dissipates heat.
Think about your home’s orientation, too. A south‑facing roof with a slight tilt can reduce overheating, letting the panels breathe. And if you run a business with a flat roof, adding a small tilt or a mounting system that creates airflow can make a huge difference.
Now, you might wonder about the upfront cost. Yes, heat‑tolerant models can be a bit pricier, but the long‑term savings usually pay off within a few years, especially when you factor in Arizona’s abundant sunshine.
We’ve seen residential homeowners cut their monthly grid usage by half after swapping to panels with a -0.3%/°C temperature coefficient. Business owners report similar drops, freeing up cash for other projects.
Ready to stop watching the sun burn a hole in your budget? Let’s dive deeper into the top picks, the tech that makes them shine, and the financing options that keep the project affordable.
TL;DR
If you’re battling scorching Arizona sun, the best solar panels for hot climates keep efficiency high by using low temperature‑coefficient cells, mono‑crystalline silicon, and smart cooling designs. Choosing these heat‑tolerant systems can slash your electric bill, boost your roof’s performance, and pay for themselves in just a few sunny years.
Top Choice 1: High‑Efficiency Monocrystalline Panels
When the Arizona sun feels like a furnace, you need a panel that doesn’t melt under the pressure. That’s why high‑efficiency monocrystalline cells are our #1 pick for hot climates. They pack more silicon per square foot, so even when the mercury climbs, they keep churning out power.
Think about the last time you stepped outside in July and the pavement seemed to radiate heat. Your roof is doing the same thing, right? Monocrystalline panels have a lower temperature coefficient—usually around -0.3%/°C—meaning they lose far less output as they heat up compared to poly‑crystalline or thin‑film options.
Why monocrystalline beats the heat
1. Denser crystal structure: The uniform cell layout reduces hotspots, so the whole panel stays cooler.
2. Higher Voc (open‑circuit voltage): More voltage means you can run a smaller array to hit the same energy target, freeing up roof space for shade‑creating vents or even a rooftop garden.
3. Better durability: These panels often come with tempered glass and anodized frames that shrug off sand, wind, and the occasional hail—perfect for the Southwest.
And here’s a quick sanity check: In our experience, a residential homeowner who swapped to a monocrystalline system saw their monthly grid draw drop by roughly 45% during the hottest months. Business owners notice a similar swing, freeing cash for payroll or inventory.
But you might wonder, “Are they worth the extra bucks?” The answer is yes—if you factor in the higher energy yield over a 25‑year lifespan, the payback period usually shrinks to 4‑5 years in Arizona, especially when you pair them with our financing options.
We also love that these panels play well with cooling tricks. Adding a simple back‑sheet vent or installing them on a slight tilt creates a natural airflow that can shave another 5‑10% off temperature‑related losses.
Want to see the full Arizona shortlist? Check out our Arizona top‑pick guide for a side‑by‑side comparison of the best heat‑tolerant models.
Now, imagine a luxury villa in Marbella where the owners want to showcase sustainable living without sacrificing style. They could integrate monocrystalline panels that blend into the sleek roofline, delivering clean energy while preserving the aesthetic. Learn more about the kind of high‑end projects that inspire us here.
Below is a quick video that walks you through the installation process for a typical monocrystalline roof‑mount system. It covers mounting, wiring, and the little tricks we use to keep panels cool.
Notice how the installer leaves a half‑inch gap between the panel and the roof deck? That gap is intentional—it creates a convection channel that pulls hot air up and out, acting like a passive cooler.

Ready to make the switch? Start by getting a shade analysis—if your roof gets more than six hours of direct sun, monocrystalline is the safe bet. Then reach out for a free site audit; we’ll model your expected production and run the numbers against local incentives.
Bottom line: monocrystalline panels are the workhorse for scorching climates. They stay efficient, durable, and they look good doing it. Pair them with a smart mounting system, and you’ll have a solar solution that laughs at the heat while quietly slashing your electric bill.
Top Choice 2: Thermally‑Stable Polycrystalline Panels
Ever glance at your roof and think, “Maybe I should give polycrystalline a chance?” You’re not alone—many homeowners automatically skip it for the flashier monocrystalline. But in blistering heat, those darker cells can actually hold their own, especially when you pick the right model.
Thermal stability boils down to the temperature coefficient. Polycrystalline panels typically sit around ‑0.40% to ‑0.50% per °C, a tad higher than monocrystalline, but newer HJT‑enhanced versions have nudged that number down to ‑0.30% / °C. That tiny shift means a 400 W panel running at 50 °C still pumps out roughly 380 W instead of dropping below 350 W. The data comes straight from the Tongwei research that breaks down these numbers for hot‑climate performance here.
Why polycrystalline can be a smart hot‑climate pick
- Cost‑effective power density. You’ll often find poly‑ panels priced 15‑20 % lower per watt, a big win if your roof space isn’t a premium.
- Proven heat‑tolerance. Modern poly‑crystalline cells use refined crystal growth that reduces hot‑spot formation, keeping degradation under 0.6 % per year even at 60 °C.
- Durable backsheets. Many manufacturers now pair poly‑ panels with POE encapsulants and polyamide backsheets that survive 90 °C+ without yellowing.
Picture a homeowner in Tucson who swapped a 250 W poly‑ array for a newer 340 W version with a –0.30 %/°C coefficient. After a scorching summer, their utility meter showed a 12 % bump in output, simply because the panels stayed cooler under the same sun.
On the commercial side, a small distribution warehouse in Las Vegas installed a 10 kW poly‑crystalline system on an elevated rack. The 6‑inch gap let air flow freely, dropping panel surface temps by about 7 °C. The result? An extra 4 % energy harvest during peak July days—enough to shave a few hundred dollars off the electric bill each month.
That short video walks through the exact mounting technique we use on flat roofs. Notice how the brackets create a clear airflow channel and why we recommend a light‑colored under‑layment to reflect heat.
What to look for when you shop
- Temperature coefficient ≤ ‑0.35% / °C (the lower, the better).
- POE or high‑grade EVA encapsulant for long‑term UV resistance.
- Polyamide‑based backsheet or double‑glass construction for 85 °C+ durability.
- Certified IEC 61730 and IEC 61215 ratings – they guarantee the panels survived lab heat‑cycling tests.
Installation tricks that keep poly‑ panels cool
- Elevate the array 6‑12 inches off the roof; even a modest gap can cut temperatures by 5‑8 °C.
- Choose a tilt of 20‑30° in desert zones; the steeper angle encourages hot air to rise away from the cells.
- Install a reflective white membrane or light‑colored decking beneath the modules to reduce heat soak from the roof.
- Space rows 4‑6 inches apart on ground mounts; it prevents the “thermal blanket” effect that plagues tightly packed arrays.
Maintenance is simple but vital: a quick rinse every three months removes dust that can add 5‑8 °C of extra heat. And don’t forget to inspect the mounting hardware after the first summer – expansion‑contraction can loosen bolts, which would otherwise create micro‑gaps and hot‑spots.
Bottom line: if you’re balancing budget constraints with scorching sun, thermally‑stable polycrystalline panels give you a sweet spot of affordability, durability, and respectable output. At Pep Energy, we love pairing these panels with smart inverters so you can see the real‑time temperature‑adjusted performance and fine‑tune the tilt if needed.

Top Choice 3: Bifacial Panels for Hot Climates
Ever wonder why some panels seem to keep humming even when the pavement radiates heat like a furnace? That’s the magic of bifacial technology – it harvests sunlight from both the front and the back, giving you a little extra juice when the sun’s blazing.
In a desert‑like backyard or a flat‑roofed warehouse, the roof itself becomes a reflector. A light‑colored membrane or a metal deck can bounce photons onto the rear side of the module, nudging the output up 10‑30% compared to a standard mono‑face panel.
Why bifacial panels thrive in scorching heat
First off, the temperature coefficient on many modern bifacial units sits around –0.35%/°C. That means a rise of 10°F only shaves off about 0.2% of power – barely noticeable when you’re already pulling 580 W per panel.
Second, the rear‑side cells are usually half‑cut, which reduces resistive losses and keeps the module cooler. Less heat = less efficiency loss, and the extra rear‑side photons compensate for any small dip.
And because the back of the panel is exposed, you can design a mounting system that creates a 6‑12 inch airflow gap. That airflow acts like a natural fan, dropping surface temps by 5‑8 °C on a 115°F day.
Real‑world glimpse
Picture a midsize grocery store in Tucson that swapped a 400 W mono‑crystalline array for a set of 580 W bifacial panels. The roof’s metal decking reflected enough light that the system’s AC output jumped roughly 12% during peak summer months. The owner told us the extra production covered almost all of the added upfront cost within three years.
On the residential side, a homeowner in Phoenix installed bifacial modules on a white‑coated flat roof. Because the roof reflected sunlight, the back side contributed an extra 8% of daily energy – enough to keep the air‑conditioning unit running a couple of hours longer without touching the grid.
What to look for when you’re shopping
- Temperature coefficient ≤ ‑0.35%/°C. The lower, the better for relentless heat.
- Rear‑glass or back‑sheet durability. Look for tempered glass that can handle 2400 Pa wind pressure and still stay clear.
- Half‑cut cell design. This improves low‑light performance and reduces hot‑spot risk.
- Warranty depth. A 30‑year linear performance guarantee and at least a 12‑year product warranty keep peace of mind.
One product that ticks many of these boxes is the Philadelphia Solar 580W bifacial panel. It boasts 22.44% efficiency, a –0.35%/°C temperature coefficient, and PERC‑backed cells that capture up to 12% more photons than a conventional front‑only design.
Installation tips that keep bifacial panels humming
1. Leave a clear gap. Even a two‑inch gap under the panel lets hot air escape and lets reflected light hit the back side.
2. Use a light‑colored or reflective underlayment. White membranes, aluminum decking, or even a reflective paint coat can boost rear‑side irradiance by 5‑10%.
3. Angle the array modestly. A 10‑15° tilt on flat roofs is enough to let air flow while still catching the sun’s direct rays.
4. Plan for cleaning. Dust in the desert can block up to 8% of light. A quick rinse every three months restores performance.
5. Pair with a smart inverter. Real‑time monitoring lets you see how much rear‑side energy you’re actually getting, so you can fine‑tune the tilt or add more reflective surface if needed.
Bottom line
If you’re juggling scorching sun, limited roof space, and a desire to squeeze every possible watt, bifacial panels are a solid contender. They turn the roof itself into a partner, not just a platform, and their modest temperature coefficient means they stay efficient when the mercury spikes.
We’ve seen residential homeowners and commercial operators alike shave a noticeable chunk off their electric bills by simply adding that reflective boost. When you pair the right bifacial module with a well‑designed mounting system, you’re basically getting two panels for the price of one – and that’s a win you can feel in your wallet every summer.
Top Choice 4: Thin‑Film Panels with Low Temperature Coefficient
When you hear “thin‑film,” you might picture a fragile sheet that can’t stand up to a desert sun. But the reality is quite the opposite – modern thin‑film modules actually thrive when temperatures climb, thanks to their inherently low temperature coefficient.
Think about the last time you left a car window down on a scorching afternoon. The glass stays cooler than the metal frame, right? Thin‑film cells work the same way: they generate less heat in the first place, so they lose far less power as the air heats up.
There are two main reasons thin‑film panels keep their cool in hot climates.
- Material chemistry. Most thin‑film modules use cadmium telluride (CdTe) or copper‑indium‑gallium‑selenide (CIGS). Those compounds have a temperature coefficient around –0.20%/°C, roughly half of what you see in typical crystalline silicon panels.
- Flexible substrate. Because the cells sit on a lightweight, often semi‑transparent backing, they dissipate heat more evenly. The whole panel acts like a radiator rather than a heat‑trapping slab.
That means on a 115°F day a thin‑film panel might drop only 2‑3% in output, whereas a standard monocrystalline panel could be down 8‑10%.
Real‑world fit for Arizona homeowners
Picture a family in Scottsdale that installed a 6 kW thin‑film array on their south‑facing roof last summer. Their utility bill fell by roughly 18% compared with their old poly‑crystalline system, even though the roof surface regularly hit 120°F. The biggest surprise? Their panels kept humming at night during a mild fall‑winter, because the low coefficient meant they stored more energy in the attached battery bank.
For a small business – say a boutique coffee shop in Tucson – the advantage is similar. A thin‑film system can be mounted on the flat roof with a minimal tilt, leaving plenty of headroom for a rooftop patio. The low heat gain means the coffee equipment inside stays cooler, and the electricity bill shrinks without the need for expensive shading structures.
Key specs to hunt for
- Temperature coefficient ≤ ‑0.25%/°C (the lower, the better).
- Module efficiency in the 15‑18% range – don’t let the “thin” label fool you; newer CIGS panels are hitting 20% in labs.
- Durable backsheet rated for 85°C+ to survive the desert heat.
- Warranty: at least 12 years product, 25‑year linear performance guarantee.
Installation tips that keep thin‑film performing
Even though thin‑film runs cooler, a smart mounting approach still matters.
- Leave a 2‑inch air gap. That tiny space lets convection pull heat away, further lowering panel temperature.
- Use a reflective underlayment. A white or light‑colored membrane reflects upward‑facing radiation, adding a few extra watts per panel.
- Mount on a slight tilt (5‑10°). You don’t need a steep angle for thin‑film, but a gentle slope improves rain runoff and airflow.
- Plan for easy cleaning. Dust still blocks light, even if heat isn’t the main enemy. A quick hose‑down every 3‑4 months is enough.
And because thin‑film panels are lighter, they’re a great match for older roofs that can’t support heavy racking. Our crew often recommends thin‑film when a structural engineer flags load limits – you get a solar upgrade without a costly roof reinforcement.
Bottom line for hot‑climate shoppers
If you’re a residential homeowner worried about soaring summer bills, or a business owner who can’t afford a massive tilt system, thin‑film panels with a low temperature coefficient are a quiet powerhouse. They deliver steady output when the mercury spikes, they’re lighter on the roof, and they play nicely with battery storage.
In our experience at Pep Energy, pairing thin‑film modules with a smart inverter and a modest battery pack gives you a system that actually feels “cool” – both in temperature and in your monthly electric cost.
Comparison Table: Specs & Performance in Hot Environments
When the desert sun turns your roof into a grill, the numbers in a spec sheet suddenly matter more than the glossy photos. So, let’s break down the bits that actually keep a panel humming when the mercury spikes.
What you should be looking at
First up, the temperature coefficient – that little negative percentage that tells you how much power drops for every degree above 25 °C. A panel with –0.24 %/°C will lose roughly half the output loss of one at –0.45 %/°C on a blistering day. You’ll also see Nominal Operating Cell Temperature (NOCT) and cell‑type (N‑type vs P‑type) pop up, and those are the secondary levers that can shave off a few more watts.
| Panel Type | Typical Temp. Coefficient | NOCT (°C) | Key Heat‑Handling Feature |
|---|---|---|---|
| High‑Efficiency Monocrystalline (N‑type) | –0.24 %/°C | 44 | Low‑iron tempered glass + back‑sheet with heat‑dissipating polymer |
| Thermally‑Stable Polycrystalline | –0.30 %/°C | 48 | POE encapsulant + reflective underlayment |
| Thin‑Film (CdTe or CIGS) | –0.20 %/°C | 38 | Flexible substrate that spreads heat like a radiator |
Notice how the thin‑film row shows the lowest coefficient and the coolest NOCT. That’s the physics Finn Peacock explains on SolarQuotes’ temperature‑coefficient guide – the cooler the cells stay, the less voltage they lose, and the more energy you keep.
How to use the table for your roof
Step 1: Pinpoint your typical panel temperature. In Phoenix a flat roof can hit 60 °C on a peak day, while a modest 5‑10° tilt might keep it near 48 °C. Plug that temperature into the coefficient column and you’ll see a quick estimate of loss.
Step 2: Match the NOCT to your mounting style. If you’re planning a rack with a 2‑inch airflow gap, aim for a panel whose NOCT is under 45 °C – that gap alone can drop the operating temperature by 5‑7 °C.
Step 3: Factor in your budget and space. Monocrystalline packs more watts per square foot, so you need fewer panels, but they’re pricier. Thin‑film wins on weight and heat, making it ideal for older roofs that can’t bear heavy racks.
Step 4: Check warranty depth. Most manufacturers back a 25‑year linear performance guarantee, but the ones with the best temperature coefficients often throw in an extra five‑year product warranty – a nice safety net for the desert.
One nuance many overlook is the cell chemistry. N‑type panels tend to keep a tighter voltage curve as they heat, which is why the REC Alpha Pure and similar models dominate the low‑coefficient rankings. P‑type panels, while still common, usually sit a few points higher on the loss scale. If you’re juggling a tight budget, a good P‑type panel with a –0.30 %/°C coefficient can still beat a cheap monocrystal that sits at –0.38 %/°C. In practice, pairing a modest‑cost P‑type module with a well‑ventilated rack often narrows the performance gap to under 2 % on the hottest days today.
So, what’s the sweet spot for a typical Arizona homeowner? If you have a south‑facing roof with a 10° tilt, the monocrystalline option gives you the highest wattage per foot while staying under 5 % loss on the hottest days. If your roof can’t handle the weight, thin‑film delivers a steady 2 % loss even when the sun feels like a furnace.

Bottom line: the “best solar panels for hot climates” aren’t just about the highest efficiency rating; they’re about how little they let heat drag them down. Use the table, run the simple math, and you’ll pick the panel that stays cool enough to keep your electric bill from melting.
Conclusion
So there you are, staring at the desert‑hot roof and wondering which panel will actually survive the blaze. The good news? You now have a clear hierarchy: low temperature‑coefficient panels, smart mounting, and a little airflow go a long way.
Remember, a –0.20%/°C thin‑film module will lose just a couple of percent on a 115°F day, while a –0.35% monocrystalline still beats a cheap poly‑crystalline that sags in the heat. Pair any of these with a simple 2‑inch gap or a reflective underlayment, and you’ll shave 5‑10°F off the panel surface.
What’s the next step? Grab a quick spreadsheet, plug your roof’s tilt, orientation, and typical midday temperature into the table we walked through, then match the numbers to the panel type that fits your budget.
If you’re a residential homeowner, start with a modest‑cost poly‑crystalline rack and watch the savings climb. If you run a business and can afford a premium, the high‑efficiency monocrystalline or bifacial option will pay for itself in a few sun‑rich years.
Bottom line: the “best solar panels for hot climates” aren’t a single product, they’re the combination of the right cells, proper airflow, and a realistic budget. Ready to turn that scorching roof into a steady‑state power plant? Let’s get the design on the table and start cutting those electric bills.
FAQ
What makes a solar panel the best for hot climates?
When the sun’s blazing, the panel’s temperature coefficient is the deal‑breaker. Look for a number around ‑0.20%/°C or lower – that means the panel loses only a tiny slice of power as it heats up. Pair that with a sturdy glass rating, good airflow clearance, and a reputable warranty, and you’ve got a module that stays efficient even when the roof feels like a grill.
Do monocrystalline panels really outperform other types in the desert?
In our experience, monocrystalline cells pack more silicon into each wafer, so they generate more watts per square foot. That density, combined with a low temperature coefficient, lets them keep output high on scorching days. For a typical Arizona roof, a well‑ventilated monocrystalline array can shave 5‑10% off the seasonal loss you’d see with standard poly‑crystalline panels.
Can I install thin‑film panels on an older roof without reinforcing it?
Yes. Thin‑film modules are lightweight and often come with flexible backsheets, which means the load on your structure is much lighter than a heavy crystalline rack. Just make sure you maintain a 2‑inch air gap and use a reflective underlayment. That combo keeps the panels cool and protects the roof from extra stress.
How much does airflow really matter for panel efficiency?
Even a modest 2‑inch gap under the panel can drop its surface temperature by 5‑7°F. That translates to roughly a 1‑2% boost in daily energy production during peak summer months. It’s a cheap trick – a few spacers or an elevated rack – that pays for itself in lower electricity bills within the first year.
Are bifacial panels worth the extra cost in hot regions?
Bifacial modules capture sunlight on both sides, so a reflective roof or light‑colored membrane can add 5‑12% more energy. Their temperature coefficient is usually around ‑0.35%/°C, which is still decent for hot climates. If you have a flat roof with a metal deck, the rear‑side gain often offsets the higher upfront price in 3‑4 years.
What financing options help homeowners afford heat‑tolerant panels?
Many Arizona owners lean on solar loans or leases that spread the cost over 10‑20 years. Look for a loan with a low interest rate and a term that matches the panel’s performance warranty – typically 25 years. A lease can be attractive if you want zero upfront, but make sure the agreement lets you capture the extra production that heat‑resilient panels deliver.
How often should I clean my panels to keep them efficient in the desert?
Dust and bird droppings are the silent thieves of solar output. In a dry climate, a quick hose‑down every 3‑4 months removes the bulk of the buildup and can recover 3‑5% of lost energy. If you notice a noticeable dip in your inverter’s data, a more thorough cleaning or a soft‑brush scrub might be in order.


